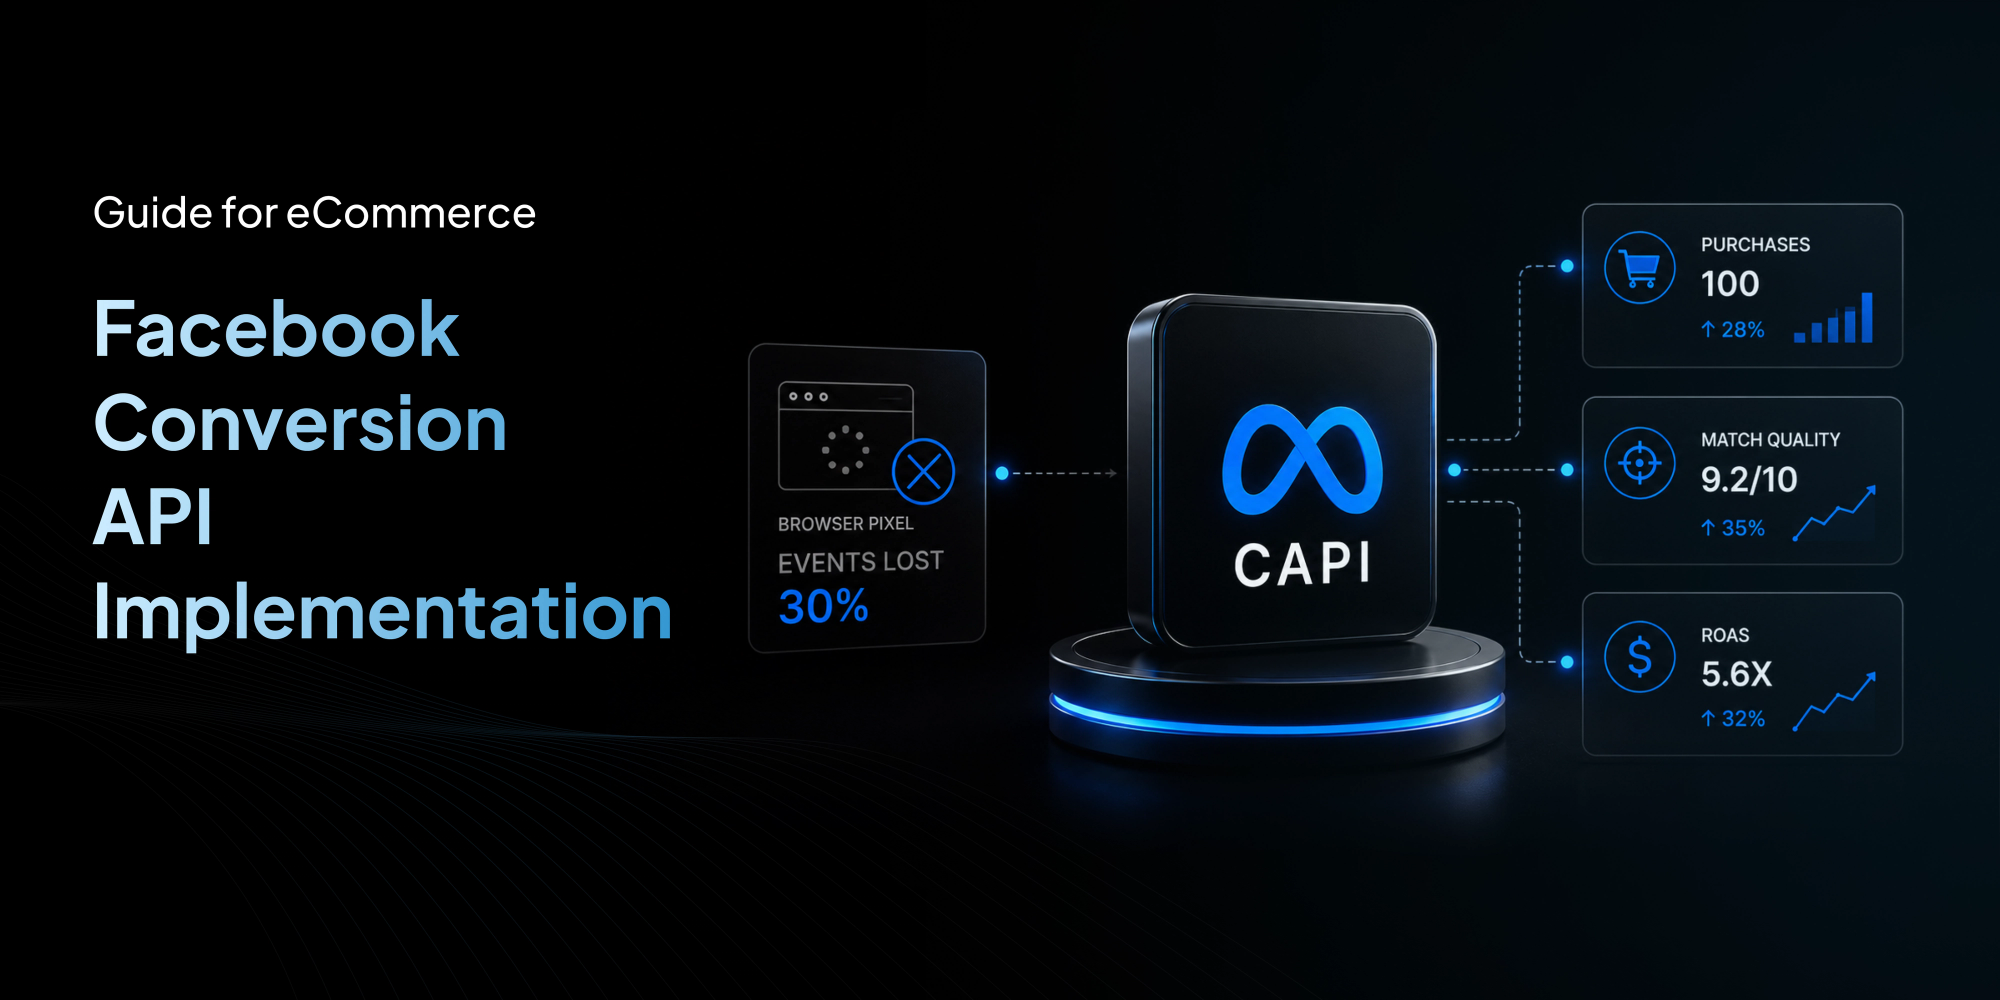
Google Analytics 4 is no longer optional. GA4 is now Google's primary analytics platform for privacy aware behavior tracking and conversion measurement. Yet most businesses install GA4 incorrectly and miss 40 to 60 percent of their conversions.
Inaccurate data leads to wasted ad spend, low ROAS, and poor decision making. Without proper event tracking and server side tagging, you are flying blind.
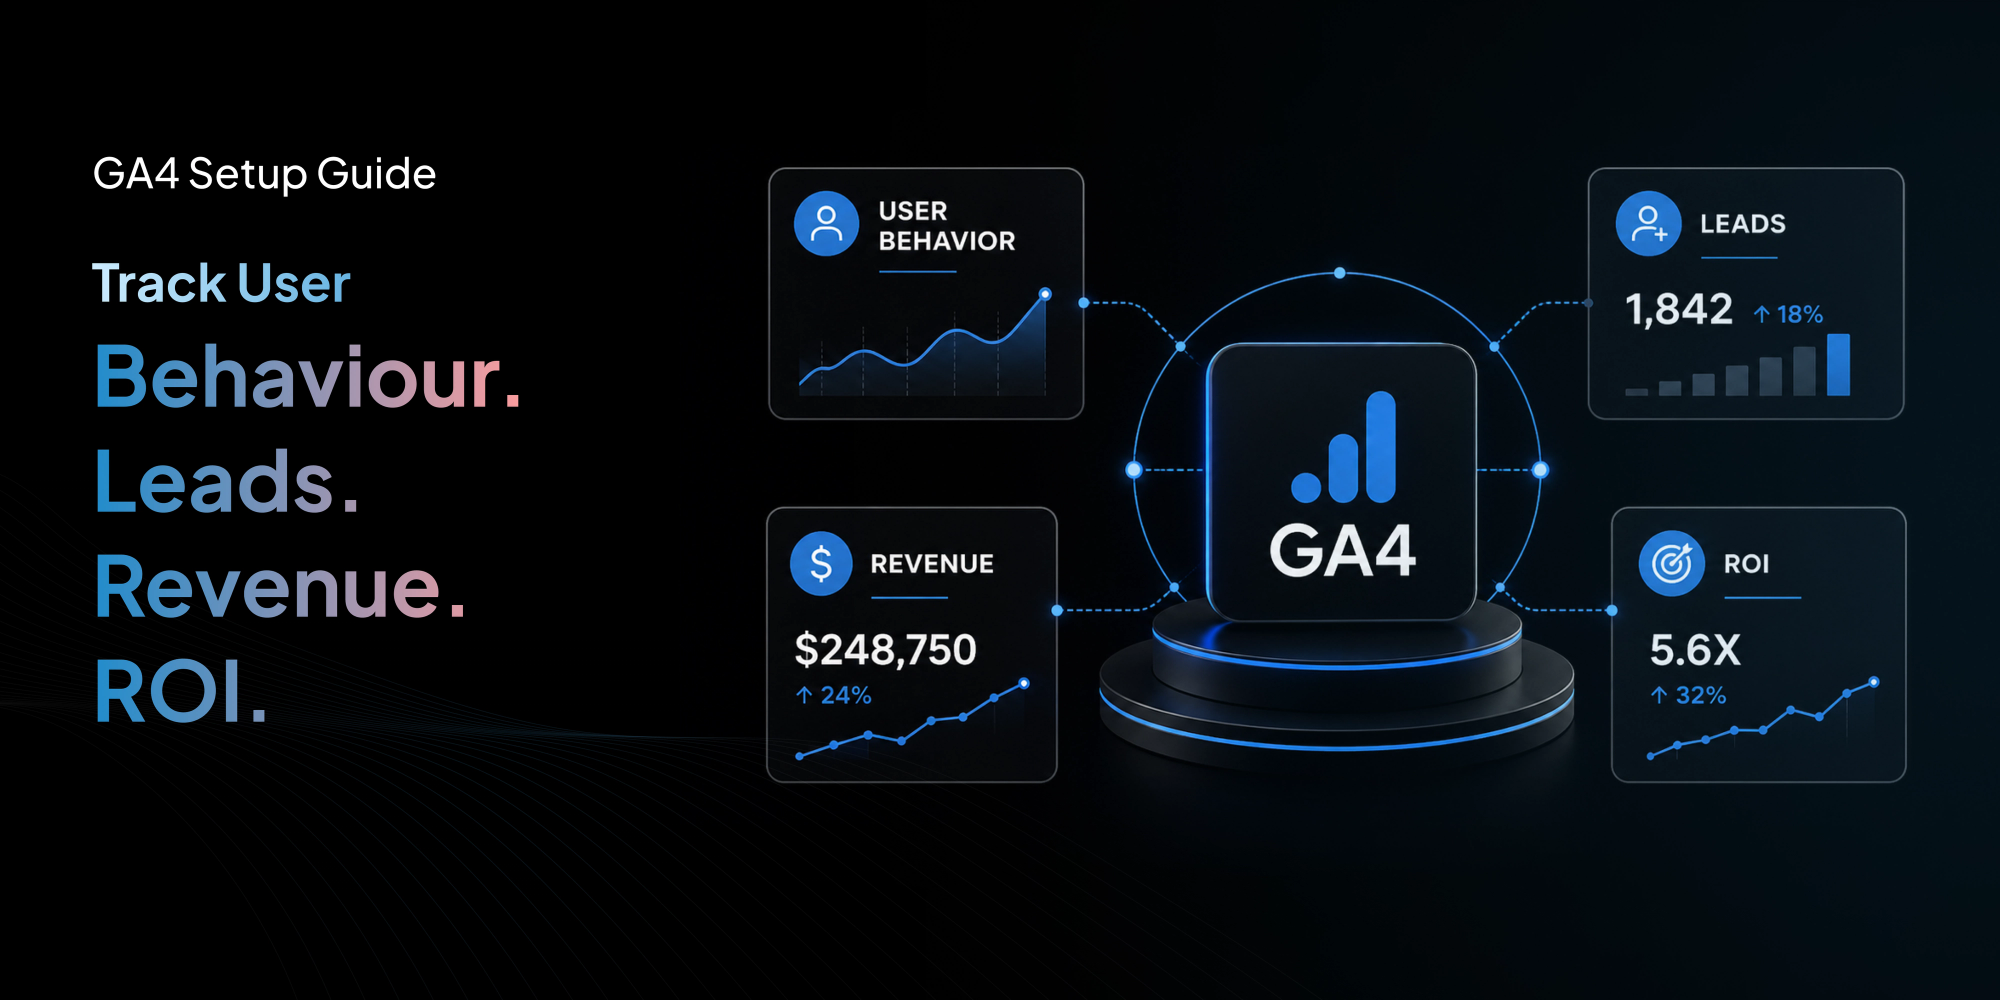
This guide is for marketing directors, agency owners, and ecommerce managers who want to stop guessing and start measuring every action that creates revenue. You will learn exactly how to set up GA4 to track user behavior, capture leads, measure revenue, and calculate true ROI.
What Makes GA4 Different from Universal Analytics
Universal Analytics focused on sessions and pageviews. GA4 uses an event based model and can continue modeling conversions even when cookies are unavailable or declined. Every interaction from scrolls to purchases is recorded as an event. This allows machine learning to predict user behavior and attribute conversions across devices.
The critical changes for your business outcomes:
-
Event driven tracking captures micro conversions you can optimize
-
Cross device measurement works even when users switch from phone to desktop
-
Predictive metrics like purchase probability and churn risk help you build audiences
-
Integration with Google Ads, BigQuery, and CRM systems enables advanced attribution
Understanding these changes is the first step to a setup that generates reliable leads and revenue data.
The Core Components of a GA4 Setup That Drives Results
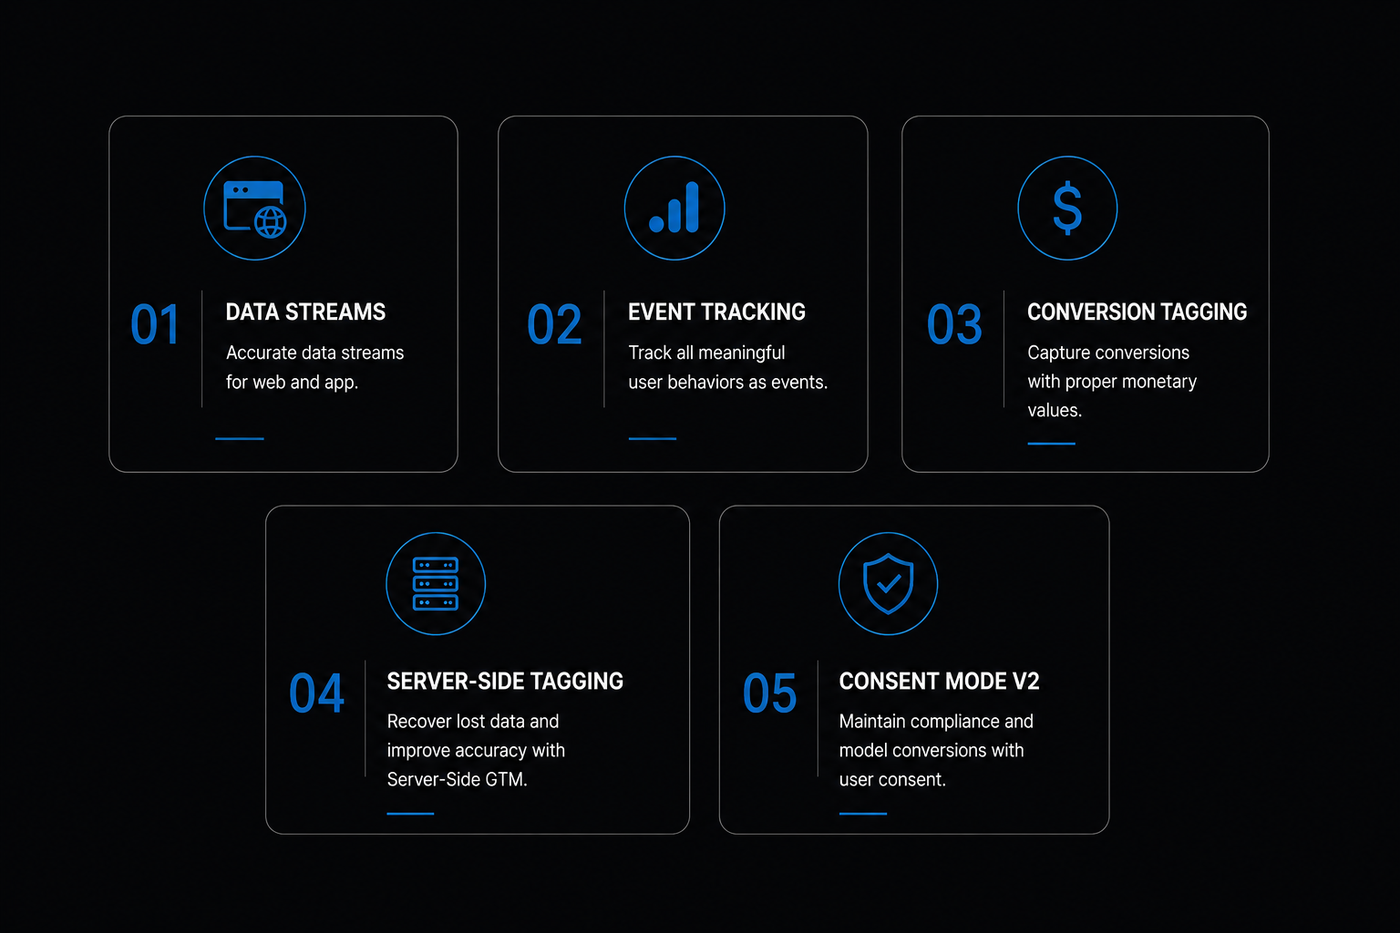
A GA4 configuration that drives measurable improvements requires five interconnected components:
-
Property with accurate data streams for web and app
-
Event tracking for all meaningful user behaviors
-
Conversion tagging with proper monetary values
-
Server side tagging via Google Tag Manager to recover lost data
-
Consent mode v2 to maintain compliance and model conversions
Without any of these elements, your data will be incomplete or misleading. We have seen companies double their apparent conversion volume after simply adding server side tracking and consent mode v2.
Step by Step GA4 Setup for Tracking User Behavior
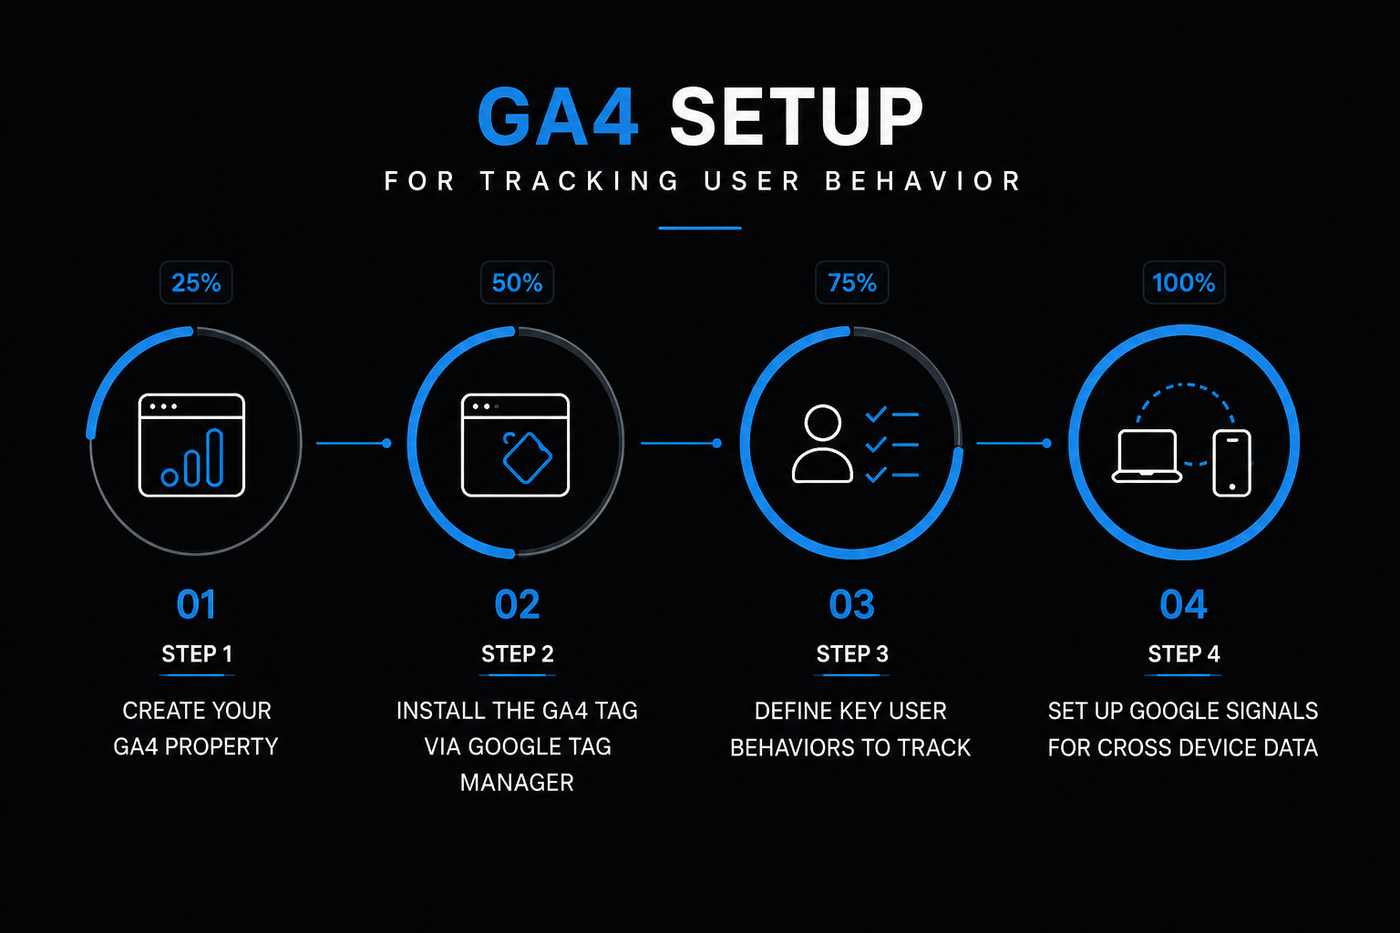
A properly configured GA4 property gives you visibility into how users browse, engage, abandon, and convert across your website. Clean tracking data helps improve attribution accuracy, campaign optimisation, and conversion analysis.
Step 1: Create Your GA4 Property
Log into your Google Analytics account. Click Admin, then Create Property. Name it after your business. Select your reporting time zone and currency. Choose an industry category. Click Create.
Within the property, go to Data Streams and add a web stream. Enter your website URL and stream name. This generates your Measurement ID (starts with G) and your stream ID.
Enhanced measurement is automatically enabled. This tracks pageviews, scrolls, outbound clicks, site search, video engagement, and file downloads without extra code. Additional business specific events still require custom implementation through GTM.
Step 2: Install the GA4 Tag via Google Tag Manager
Google recommends using Google Tag Manager for flexibility. Create a GTM account if you do not have one. Add a GA4 Configuration tag in GTM. Use your Measurement ID. Trigger it on all pages.
Test using GTM Preview mode. Confirm that the tag fires and you see data in the Realtime report in GA4.
Step 3: Define Key User Behaviors to Track
We recommend tracking at least these events for any lead generation or ecommerce site:
-
page_view (automatic)
-
scroll past 50 percent and 90 percent
-
outbound_click for external links
-
click_tel for phone numbers
-
click_email for mailto links
-
form_start and form_submit for lead forms
-
demand_demo or request_quote for high value CTAs
-
video_start and video_complete for product demos
-
file_download for brochures or case studies
-
add_to_cart, begin_checkout, purchase for ecommerce
For each event, capture parameters like form_name, button_text, page_location. This enables you to build segment reports and optimize individual elements.
Step 4: Set Up Google Signals for Cross Device Data
In GA4, go to Admin, then Data Settings, then Data Collection. Enable Google Signals. This allows Google to match users across devices when they are signed into a Google account.
Google Signals provides remarketing audiences, demographic data, and better attribution. It does not collect personally identifiable information. It respects user consent choices.
Properties with Google Signals enabled report 20% more conversions. Without it, your attribution is incomplete.
GA4 Consent Mode v2 Setup
Google made consent mode v2 mandatory for all advertisers in the European Economic Area. Without consent mode v2, your Google Ads data will degrade starting March 2024.
Every missing conversion trains Google Ads on incomplete data. That means your campaigns optimize toward the wrong users, wrong keywords, and wrong audiences.
How Consent Mode v2 Works
Consent mode v2 passes two signals to Google: ad_storage and analytics_storage, plus the newer ad_user_data and ad_personalization. When a user denies consent, Google receives a signal indicating no consent. It then uses cookieless pings and machine learning to model the conversions that would have occurred.
This modeled data is surprisingly accurate. We have tested across multiple client accounts. In many implementations, modeled conversions closely align with observed conversion trends from consenting users.
Steps to Implement Consent Mode v2
1. Choose a Consent Management Platform (CMP) like Cookiebot, OneTrust, or Complianz. Ensure it supports consent mode v2 and the four parameters.
2. Integrate the CMP script into your website via GTM using a custom HTML tag that fires before any GA4 or Google Ads tags.
3. Set default consent state using GTM consent variables. Here is exactly how to create them:
-
In GTM, go to Variables > New > Consent Variable.
-
Name the variable consent_ad_storage.
-
Set Consent Type to ad_storage.
-
Repeat for analytics_storage, ad_user_data, ad_personalization.
For users who have not yet made a choice, set default consent to denied for all storage types. This ensures you comply with GDPR even before the consent banner is shown.
To set the default, add this code after the CMP script in your custom HTML tag:
|
gtag('consent', 'default', { |
4. Update consent state on user action. Use the CMP callback function to push the consent choices into the data layer:
|
window.dataLayer = window.dataLayer || []; |
5. Configure GA4 tags to respect consent. In your GA4 Configuration tag in GTM, enable Consent Overview and link it to the four consent variables you created.
Test using GTM Preview. Confirm that when consent is denied, the GA4 tag still fires a cookieless ping (check Realtime report for the conversion event with consent_state parameter).
Why Consent Mode v2 Prevents Data Loss
Without consent mode, users who reject cookies result in zero data. With consent mode, Google Analytics still receives cookieless pings that signal a conversion event happened. The conversion is then modeled into your reports.
|
Without Consent Mode v2 |
With Consent Mode v2 |
|
❌ Lost conversion data |
✅ Modeled conversions |
|
❌ Broken attribution |
✅ Better bidding signals |
|
❌ Lower Smart Bidding accuracy |
✅ Improved attribution |
|
❌ Incomplete ROAS reporting |
✅ Higher reporting accuracy |
The difference can be dramatic. One ecommerce client lost 35 percent of their checkout data after enforcing GDPR consent until we activated consent mode v2. Their reported purchases recovered to 92 percent of pre consent levels within two weeks.
For Google Ads, consent mode v2 also enables conversion modeling. This feeds into Smart Bidding and improves campaign performance even when consent rates are low.
How to Track Leads in GA4
Leads are conversions that do not involve a direct purchase. Examples include contact form submissions, quote requests, newsletter signups, and demo bookings.
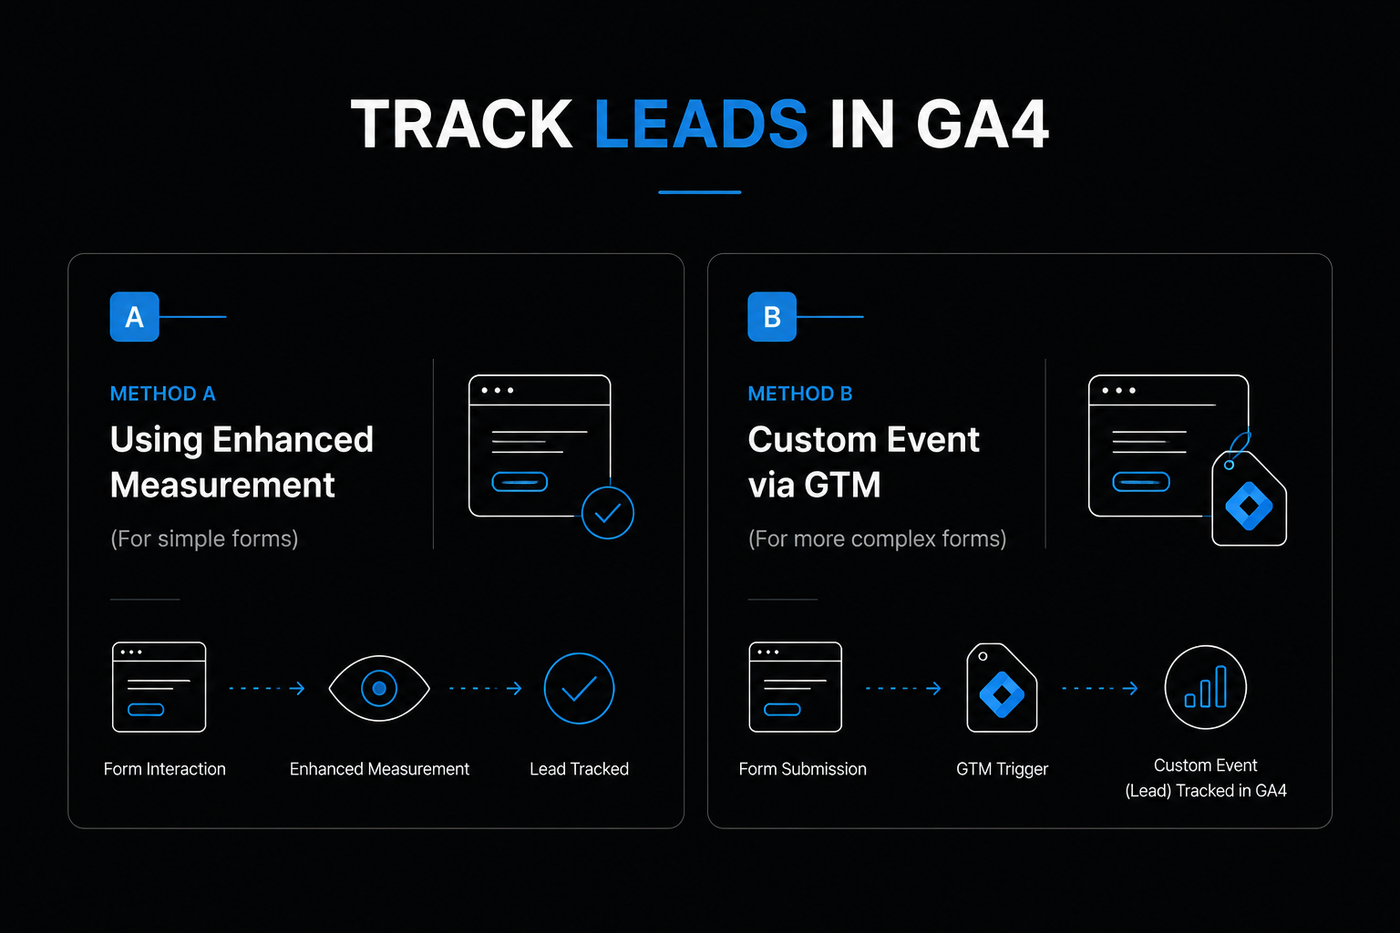
To track a lead:
Method A: Using Enhanced Measurement
If you have a simple contact form, GA4 enhanced measurement may already detect form interactions. Check in the Realtime report under Events. Look for form_start and form_submit events.
If these events appear, mark form_submit as a conversion in GA4.
We saw one B2C brand increase their Google Ads reported conversions by 18 percent after enabling Enhanced Conversions via server side GTM.
Method B: Custom Event via GTM
For more complex forms or multi step funnels, use GTM.
-
Create a new tag in GTM of type Google Analytics GA4 Event.
-
Name the event lead_form_submission or similar.
-
Set the trigger to fire on form submission.
-
Include event parameters like form_name, form_type, and lead_value.
-
In GA4, mark this event as a conversion.
For phone call leads, track clicks on phone numbers as an event. Use a click trigger in GTM that listens for tel: links.
Most chat providers like Intercom, Drift, or Tawk.to allow custom event tracking. Push a data layer event when a user starts a chat or leaves a message. In GTM, listen for the data layer push and send a GA4 event chat_initiated.
Server Side Lead Tracking for Higher Accuracy
Traditional analytics setups rely entirely on the user’s browser to send tracking data. This creates major accuracy problems because browsers, ad blockers, privacy tools, and tracking prevention systems often block or delete analytics requests before they reach GA4 or Google Ads.
Browser → GTM Web Container → Server Container → GA4 / Google Ads
Instead of sending data directly from the browser to Google, events first pass through your own server container. The server then forwards validated tracking data to platforms like GA4, Google Ads, Meta Ads, and CRMs.
This creates a more reliable and privacy aware measurement system.
One DTC brand we worked with improved ROAS from 2.1x to 3.8x within 6 weeks after fixing their GA4 setup and deploying server side tracking. The cost of the implementation was recovered in less than 2 weeks of improved ad performance.
How to Track Revenue in GA4
Revenue tracking is essential for calculating ROAS and identifying your best performing channels.
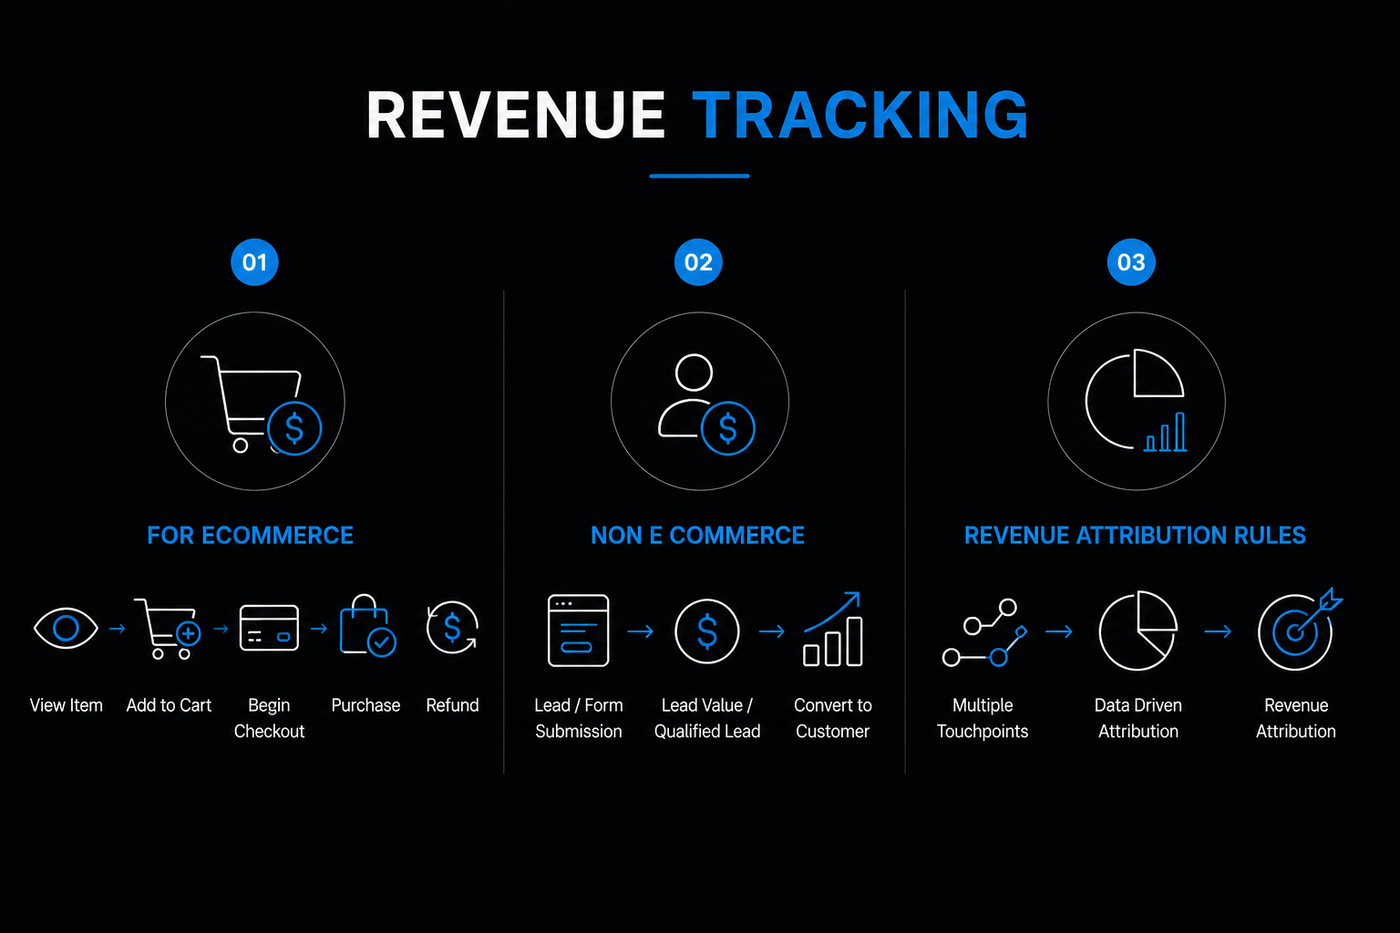
Ecommerce Revenue
For online stores, implement enhanced ecommerce by adding the view_item, add_to_cart, begin_checkout, purchase, and refund events.
The purchase event requires these parameters:
-
transaction_id (unique per purchase)
-
value (total including tax and shipping)
-
currency (ISO code)
-
items array with item_id, item_name, item_category, price, quantity
Never send an event without a transaction_id. This prevents double counting from server side and client side signals.
For subscription businesses, send recurring revenue events with a custom parameter subscription_id and billing_cycle.
Non Ecommerce Revenue
For lead generation businesses, revenue is not tied to a single transaction. You can still track revenue by sending estimated lifetime value or lead value.
Create a custom event called lead_value or qualified_lead. Include a parameter estimated_revenue. Update this value when a lead converts into a customer using a CRM integration.
For service businesses, track invoice paid events using a webhook from your billing system to GA4 via the Measurement Protocol.
Revenue Attribution Rules
GA4 uses data driven attribution by default. This model distributes credit across multiple touchpoints based on actual contribution to conversion.
To override for specific reports, switch to a different model like last click or first click in the Model Comparison tool.
For accurate ROI, ensure your revenue events include transaction_id to prevent double counting.
How to Calculate ROI in GA4
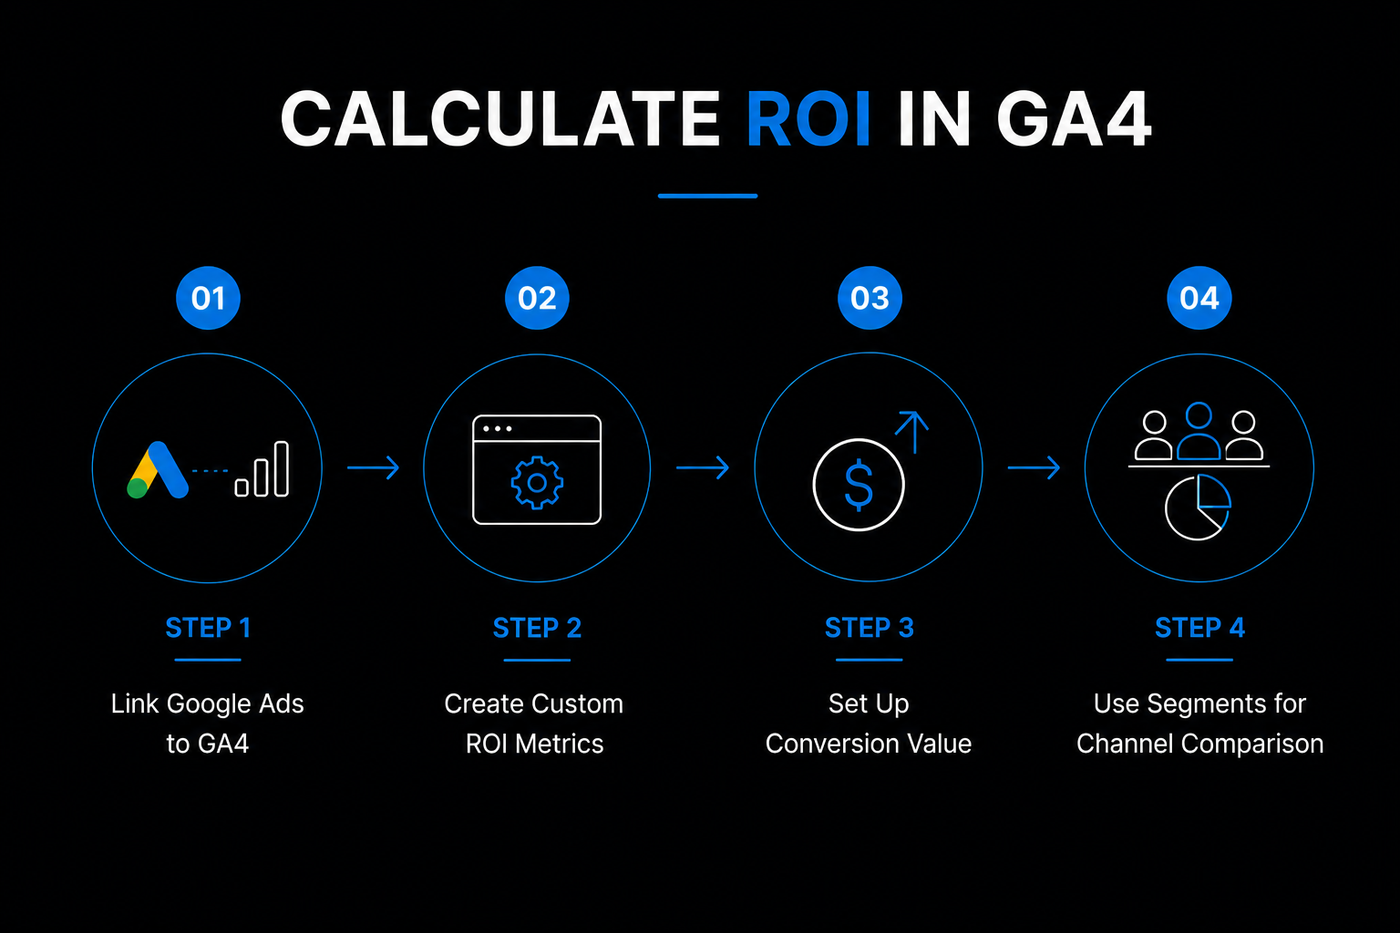
ROI is the ratio of net profit to the cost of acquiring that profit. In GA4, you can measure:
-
Return on Ad Spend from Google Ads
-
Return on organic traffic
-
Return on email campaigns
Step 1: Link Google Ads to GA4
In GA4 Admin, click Product Links, then Google Ads Links. Select your Google Ads account.
This imports click cost data into GA4. You can then see cost per conversion, cost per lead, and ROAS in reports.
Step 2: Create Custom ROI Metrics
GA4 does not have a built in ROI metric. You need to create a calculated field.
In Explore reports, create a new custom metric:
-
Name: ROAS
-
Formula: Revenue / Ad Cost
Alternatively, use the Advertising workspace. Go to Advertising, then All Features, then ROI analysis. This uses linked Google Ads data.
Step 3: Set Up Conversion Value
For a lead generation business with no direct revenue, assign a monetary value to each lead conversion.
-
Average lead to customer rate: 10 percent
-
Average customer lifetime value: $5,000
-
Value per lead: $500
Set this value in GA4 when marking the event as a conversion. Then ROI reports will reflect lead value.
Step 4: Use Segments for Channel Comparison
Create segments for source medium. Compare ROI across organic search, paid search, social, email, and direct.
Sort by ROAS to identify your highest performing channels. Then shift budget accordingly.
Common GA4 Setup Mistakes and How to Fix Them
Even well designed GA4 setups often contain small configuration gaps that quietly distort reporting. These issues can inflate conversions, hide campaign performance, and create misleading attribution data.
Mistake 1: No Internal Traffic Exclusion
Your team visits the site frequently. Without filtering, their behavior dilutes your metrics.
Fix: In GA4 Data Streams, go to Define Internal Traffic. Add your office IPs. Create a filter to exclude this traffic from views.
Mistake 2: Duplicate Events from Client and Server
Sending the same event from both sides double counts.
Fix: Include a unique event_id parameter. In your server container, check if an event with that ID already exists before sending.
Mistake 3: Missing Consent Mode v2
We still see accounts with no consent handling. When GDPR enforcement hits, they lose data.
Fix: Implement consent mode v2 as described earlier.
Mistake 4: Not Testing on Real Devices
Simulating in GTM Preview is not enough. Test on Safari with ITP enabled, on iOS mobile Safari, and on Firefox with tracking protection.
We discovered that one client's GA4 tag loaded, but the scroll event did not fire on iOS because of iframe sandboxing.
Mistake 5: Using Default Session Timeout
GA4 default session timeout is 30 minutes. For content sites or B2B research, users often engage for longer.
Fix: Change session timeout to 60 minutes or 2 hours in Admin > Data Settings.
Your Next Step for a Tracking Setup That Converts
This guide covers the technical steps for GA4 setup. But implementing them correctly requires ongoing attention to detail, experience with GTM, and knowledge of server side configurations.
If your attribution looks inconsistent across GA4, Shopify, Google Ads, Meta Ads, or your CRM, there is a strong chance your tracking setup is underreporting conversions.
NFlow audits your full measurement stack including GTM, server side tagging, Consent Mode v2, enhanced ecommerce, and attribution logic.
We identify where conversion loss occurs, repair broken event tracking, and rebuild reporting accuracy so your campaigns optimize using reliable revenue data.
Most agencies can’t fix this. We hold a Google Partner badge and have audited over 200 GA4 setups.